Black lights, also known as the UV-A light, are lamps emitting long wave ultraviolet merely visible lights.
They have several important uses, including reading hidden messages, finding blood traces, examining dark spots in a building, identifying fake cash, and authenticating antiques.
Moreover, one can use black light for entertainment and create natural phosphorus on the human body, making it glow; some use it in hair gel, producing the natural glowing effect.
It is possible to buy black light products like bulbs and flashlights from stores; however, you can choose to make them on your own at home.
Here is everything you need to know to make black light.
How to Make a Black Light?
Black lights use a formed filter or coating over the set bulb to do away with the highly visible lights by producing UV lights.
The phosphorus, which reacts with emitted lights, enables one to see and feel fluorescent glows, they are mostly bought in different stores, but if you can afford to buy, you can easily make one using simple tools.
All these happen due to the science behind the lights being absorbed and emitted differently.
There are different methods and resources one can use to make a black light; following up the right procedures and having the necessary tools will lead to the development of your desired black light.
There are 3 ways to make a black light at home; let’s consider checking each on them and what it requires.
1. How to Make a Black Light out of a Light bulb?
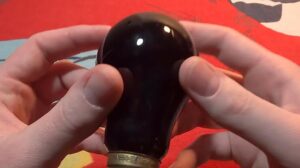
Making a black light from a light bulb is the easiest approved way one gets a black light; you only need the following:
- A light bulb
- Soft rag
- Glass cleaner
- UV paint
- Paintbrush
- Light bulb stabilizer
Step 1: Use a soft rag with a glass cleaner to clean your light bulb, allow it to completely dry. Make sure you avoid touching the cleaned light bulb as it might fail to stick the paint. (Here is a good bulb for your to get)
Step 2: Then pick the method you will use to stabilize the light bulb; there are many options like string suspends, place it in a ball of clay, or any other way you would choose provided the light bulb stays upright.
Step 3: Paint the light bulb evenly and allow it to completely dry; this should be done a few hours before you start your project or even leave it overnight.
When it dries, apply one more coat and leave it to dry, now you can be put it in the light fixture, be more careful since they probably can get very hot.
Step 4: Make a black light poster using a permanent marker, florescent paint, brushes, and a poster board; using a highlighter, draw heavy black lines to separate the colors.
It is recommended for one to turn off the light when doing this, be careful due to the bulb’s ability to become very hot and lead to melting of any plastics used in your project or even cause burns.
Step 5: To ensure complete safety, expose small amounts of black lights as it has been found out that excessive exposure to the UV rays possibly leads to the growth of malignant melanoma.
2. How to Make Black Light Through Smartphone?
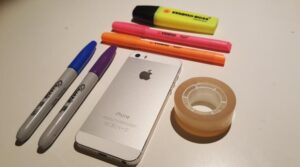
Most people did not know that it is possible to make a black light from a phone’s led flashlight, black lights can be made in many different ways and styles, but they always serve similar purposes no matter the making process.
With a few simple steps, you will come up with a black light with the same features.
You will need very few requirements; the most crucial thing you must get is a smartphone with flashlight capabilities, purple markers, clear tape, and blue.
A highlighter pen might be needed; however, it is not of much importance as one might need it for making some artwork that the backlight can bring to life; you can choose from yellow, orange, and pink as they have been confirmed to be working best here.
With the right materials near you, you can do this within the shortest time possible
Step 1: Take a strip of clear tape and carefully place it right on top of the LED flashlight back on your phone. Do not confuse the flashlight from the camera. The flashlight is just close to the camera, not on it.
Step 2: Using a blue marker, paint the top of the tape until the color gets more intense and completely cover the flashlight.
Step 3: Take another tape and place it over on top of the other colored one; take another final piece of tape and place it on top of the other two.
Step 4: Use a purple marker to color the third and last tape, and there you already have a black light without long and complicated procedures.
In place of tapes, you also consider using cellophane; however, you will not need marker pens for coloring in the case where you will use the latter.
You will have to buy readily colored blue and purple cellophane, and now because cellophane does not stick, you will have to find something that will make them stick; you can also tapes to hold them in place.
Step 5: To test the effectiveness of your black light, you should consider doing this; take a piece of white paper and write or draw anything on it using the highlighter.
Step 6: Then, consider turning on the developed purple light, feature your drawing in a dark room as you shine the tinted blue/purple light on it.
If you did well in developing the blacklight, your drawings would come back to life, making them look more competent in the dark.
The type of highlighter used to determine the results one is likely to get; however, the pink, yellow, and blue have been confirmed to be giving the best results.
3. How to Make a Black Light out of a Flashlight?
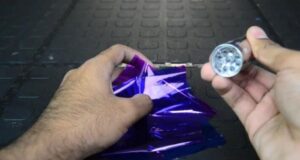
Making UV black light at home is a few steps procedure that needs little than you even expect, have the key requirements, and be ready to follow the following steps. You will find a light source, cellophane, and a rubber band to make it go through.
Step 1: Start by choosing the preferred source of light, and you can go for a cellphone flashlight, a LED flashlight, or a small LED video light.
Choose one among these or any available light source; however, it would be better to consider choosing the source of light that is easily available, and almost everyone can afford them.
Step 2: Next, consider choosing the right or preferred cellophane color; take two purple cellophane pieces and one piece of blue cellophane.
Step 3: Cut the cellophanes properly and fitting to make sure that they properly cover your source of light.
Cellophane is bought, but one can also easily improvise them from candy wrappers; if you would not like to spend much on buying them, consider finding two purple and one blue candy wrapper.
They still work the same as the cellophane; the results attained from either the cellophane or candy wrappers have a very small difference.
Step 4: Cover the source of light using the purple cellophane or candy wrapper, use a rubber band to secure it from falling off tightly; if you don’t want to hold them from falling but want to work freely, consider securing it.
Step 5: Add another purple cellophane on top of the first one and secure it again with a rubber band, then finally finalize with the blue one as you tightly secure it as well. There you are ready with UV black light made from simple tools and steps.
What will it be if you won’t test your UV blacklight? Conduct testing using a highlighter pen, either yellow, blue, or any of your choice. You can easily use the fluorescein extracted from a highlighter pen, and you will see incredible results out of this.
What Colors Make a Black Light?
Not all colors glow under the blacklight; when going to parties and other night events that will use black lights, everyone wants to be noticed by their crazy-colored clothes.
Therefore it is crucial to know the colors that make up the blacklight; what glows best under the black light?
And how you can paint your body to glow under the black light.
Many tests have shown that fluorescent green, orange, yellow, and pink are the best colors that highly glow in black lights from a selection of different colors.
However, red, purple, and blue also glow, but they do not appear as perfect as the first ones.
Therefore, if you plan to go for a black light party, choose the mentioned colors, and focus on the type of fabric.
Generally, fluorescent and white materials glow to the highest on the blacklight; when the neon color is bright, it will increase the chances of glowing more.
The Science Behind the Blacklight Hack
From the projects above, creating black lights from flashlights, bulb lights, and phones comes with science that everyone would love to understand. All these revolve around light emission and absorption, making light and cellophane sources to glow in the dark.
What’s the science behind all these three hacks?
The following should be able to answer your questions, clear all misunderstandings and myths about it:
1. Light is a spectrum.
What does this mean? It means that anything we see about light is known as visible light, ranging from blue to purple. Although various other types of lights include UV and infrared lights, the black lights always emit the UV light.
2. Markers combined with the cellphone are close to UV spectrum.
When the tape is colored blue and purple using markers or where one gets blue and purple cellophane, it leads to the creation of filters that automatically blocks all other colors of any visible light and only allow blue and purple to pass through.
The other various visible light spectrums are blocked out; the blue and purple lights were enough to fluoresce the highlighter.
It is achieved because the purple and blue light wavelengths are very close to the UV spectrum despite little UV light.
3. The highlighters easily fluoresce on a normal backlight.
How is this possible? This happens due to its ink’s ability to easily absorb the ultraviolet lights, which can’t be seen with naked human eyes, and then remits it as visible lights.
Conclusion
The whole idea of coming up with easy methods of making black lights homemade everything better; however, some other complex materials and steps might be needed but only on complex black lights.
The cellophane is safe and the best idea to put up with as it easily isolates light and only allows the purple and blue lights to go through.
All the mentioned projects take less than ten minutes of your time. Therefore, you can spare time to do other important things.