Proper lighting leaves a house or an office dazzling and complemental. Compared to the old era, in the day-to-day, there are different ways one can use while installing ceiling lights. How you do your installation determines how other people rate your lighting.
Therefore, due to technological growth nowadays, lighting is a big deal. It’s necessary to consult a professional electrician in case you are doing ceiling light installation as a first-timer and more so, if not replacing an old one.
Once you are equipped with the necessary recommendations for spacing and replacements then the following steps are important.
Step 1. Ceiling Light Preparation.
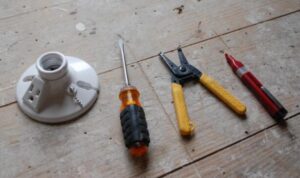
How well you get prepared determines the amount of time you use to complete the project. During preparation gather all tools that you will need to do the task.
These tools include:An electrician’s tape measure, a pair of pliers, ladder or step stool, wire caps, flat head screwdriver, Philips head screwdriver, wire stripper, safety glasses, drywall screws, drills, lights to install, stand finder, and wire connectors.
In this stage, ensure you understand the kind of ceiling light you want to install.
Whether you want to install hanging ceiling lights, recessed lights or track ceiling lights, one needs to ensure all materials and tools are ready before commencing.
Make sure you have a friend nearby to assist in handing you things.
Step 2. Switch Off the Power.
You need to turn off the power directly from the electrical circuit panel or the main switch. This acts as a safety measure that prevents you from electrical shocks while undertaking the task. It also helps in overcoming short-circuiting of fuses while working.
You also need to switch off light’s wall switches to ensure the working area is secure.
In that case, it’s very important to check that all rooms’ lights are off in case of replacing an old ceiling light before starting the installation process.
Step 3. Remove Old Fixture.
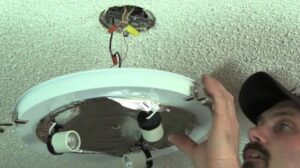
The location for installation needs to be prepared whether you are installing new ceiling lights or replacing an old one.
In case of replacing an old fixture, it’s good to take a photo of the already wired fixture before disconnection and use it to wire the new lights.
Disconnect old fixtures existing in the place and clean that area for a new installation.
- At first, remove the mounting plate using a screwdriver and then ensure that all current wires are detached.
- Remove the bulb from the holder and detach the base.
- Ensure no cables are connected to the power source by separating both ceiling wiring and fixture wiring.
The old fixture is ready to remove after disconnecting the three sets of cables.
Step 4. Set up Connections.
In a situation where you are supposed to replace an old light fixture, you will use the existing electrical wires to install a new ceiling light. However, in case of none in place, you can install light cables from the power source.
First, ensure the ground wire runs together with white and black ones at all times through the opening.
At least 18 inches of the cables should be left hanging for easier wiring of fixtures.
Depending on how the ceiling is you can either snake the cables down through the ceiling joints gaps left or run them through the attic provided. Whichever, means you choose to use, ensure correctly handling over the cables to the installation spot.
Step 5. Connect Fixtures.

Before mounting the fixtures, secure the screws to ensure the stability of an electrical junction box.
Tighten all loose screws using the screwdriver. Although different manufacturers’ guidelines tend to slightly vary, it’s important to rely on provided instructions as per ceiling light package.
Before attaching the cables, resize the hanging wires by trimming them to avoid short-circuiting when they inter-cross.
Generally, in this stage, the thumb rule plays a key role, where cables of similar colors are connected.
Always start with grounding wires or green ones, white and lastly the black cables.
Ensure you connect hot cables with a wire cap and for additional safety, seal the wire caps with electrical tape.
Step 6. Secure the Base And Mount the Lights.
Once all fixtures are connected and all wire caps sealed or wrapped, fold the wire into the light electrical junction box.
Secure the base using hardware provided with a light fixture and ensure the base is attached to the electrical box.
Place all cable connectors back and screw them tightly in place. Every cable has its very own connector, thus it’s easier to connect.
Once the cables are in place and firm, proceed to bulb holder installation.
Attach the light holder to the ceiling through a drilled opening and ensure it’s balanced for uniform distribution of light in the room.
While doing the installation of recessed ceiling lighting ensure you put the light into a hole and push it to flush with the ceiling. This makes light mounting perfect and stable to hold bulbs.
Step 7. Install Bulbs.
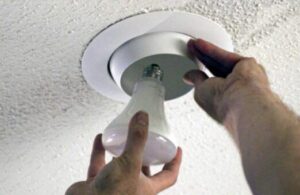
Placing a correct wattage light bulb into the bulb holder is the only and best way to check if your project is okay or not.
The key thing here is to ensure you follow the manufacture’s fixtures’ wattage recommendations. This prevents the fixture from getting damaged.
And for better efficiency, always consider using LED light bulbs. They consume less energy hence reduces electricity bills. Therefore, choosing light bulbs of the right voltage prevents overheating and increases its lifespan.
Step 8. Turn on the Power.
Turn on the power back from the main switch and don’t forget to turn the light switch on.
In this step, check on the overall light distribution.
In case they are not working correctly or one does not light. Just recheck the junction box connection as white or black cable couldn’t be fully attached.
In this case, closely inspect the connection and cables.
Wrapped up
Light plays an important role as nothing can be done especially at night. Advanced technology has enhanced proper lighting making rooms dazzle.
As we have seen, installing a ceiling light requires one to gather all the needed tools before commencing your project. Always adhere to instructions provided on the manufacturers’ package.