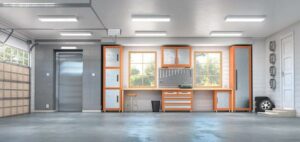
Are you a professional woodworker or craftsman? Do you love pouring your heart and soul into DIY projects? In any case, if your daily routine involves spending a lot of time in the workshop, it’s time you reconsider the lighting.
The lights installed in your workshop have a great impact on the task. A brightly-lit environment helps increase visibility and avoid mistakes in your projects. It also helps prevent potential injuries.
However, this doesn’t mean you must fill your workshop with powerful, blinding lights. Instead, you should use specific lumens for optimal results. But, how many lumens per square foot workshop is best? Find out the answer in detail below!
How Many Lumens Per Square Foot Workshop?
Lumens refer to a measure of how much visible light a bulb emits. It is always present in the manufacturer details section printed on the bulb’s packaging. Typically, a higher lumen produces a brighter light.
So, when choosing work lamps, you should always consider the lumens instead of watts. It’s because lumens help determine the brightness levels. With lumens known, you can also figure out how many bulbs are sufficient for your workspace.
That said, a bulb is available in a diverse range of lumens. You will find bulbs rated anywhere from 5 to 5000+ lumens. Certainly, you cannot test all to decide which one lights up your workshop the best.
It is why we must go by the general rule that suggests you should use 130 to 150-lumens per square foot workshop. This particular recommendation ensures a consistent and evenly-spread light.
However, you may want to change it a little if your workspace is smaller or larger than a standard one (125-feet).
You may also want to go by other lumens per square foot, depending on the activity.
For example, 60 to 80-lumens per sq ft is sufficient for general bench work. 80 to 100-lumens per sq ft is enough for handwork. Meanwhile, 100+ lumens is the sweet spot for all tasks, including precise joinery and machine work.
How to Calculate Lumens for Workshop Lighting?
Now that you know lumens per square foot for your workspace. You might want to know the total lumens required for lighting installation. For this, it’s easier and quicker to use one of the many online lumen calculators.
However, you can also do it all yourself. Here’s how to calculate the total lumens for workshop lighting:
Step 1: Find the Total Workshop Area
First, take a measuring tape and set it down to find the total area of your workplace. Measure the length and width separately. Then, multiply them to determine the number of square feet.
Step 2: Decide the Lumens Per Square Foot Needed
We’ve already discussed the recommended lumens per square foot for a workshop. The 130 to 150-lumens work well for all activities. However, you may want lesser lumens for general DIY purposes or higher lumens for more detailed tasks.
Step 3: Multiply Both Values
Once decided, multiply the total workshop area with the lumens per square foot. For example, if your workspace is 150 sq ft and the required lumens are 130 sq ft, the total would be 19,500-lumens.
After this, you can use the total lumens required to find the number of lights. Just divide the lumen rating of the bulb by the total lumens needed. Let’s say you want to purchase fluorescent bulbs with a rating of 2500-lumens each.
19,500/2500 = 7.8
Round this number to 8, and there you have the answer. You will need 8-fluorescent bulbs rated at 2500-lumens to light up a 150-sq ft workshop.
What Is the Light Lumen Range for a Workbench?
The workbench refers to the working tables and surfaces. Typically, we do all the detailed and precision-based tasks here. So, these surfaces need more illumination than other areas of the workshop.
As per IES, the recommended light lumen range for a workbench is 300 per sq ft. You can multiply this by the total area of your workbench to find the total lumens needed.
Please note that IES is a short form of the Illuminating Engineering Society. It is a non-profit organization that decides the standards regarding lights.
Things to Consider When Selecting the Right Fit Workshop Light
Once you know the lumens needed, it’s important to ensure that the chosen light is of the right fit. Remember, there are hundreds of different lights available in the market. So, navigating through them to select the best one for your workshop might not be easy.
But, worry not because we’ve researched and compiled all the essential things to consider. Read more!
1. What Color Temperature to Choose for Workshop?
The color temperature refers to how cool or warm the light appears to be. It greatly affects our perception of things. Warm light makes things seem yellowish, while a cool light makes everything faded and bluish.
Usually, lighting fixtures come in the range of 2700K to 35000K. The lights between 2700K and 4000K are warm. Meanwhile, the lights above that range are cool.
For a workshop, it’s best to choose a cool light at around 5000K. Don’t exceed this limit, as it can make things appear very sterile and blue.
2. What CRI Level Light to Choose?
CRI is a short form for color rendering index. It is a measure that determines how accurate a color appears to be under artificial light. You will come across lights with CRI ranging from 0 to 100.
If your work involves paints, stains, and colored finishes, then always go for the higher value. A higher CRI means you will be able to see more accurate colors and work more perfectly. The ideal CRI for workshop lights is 92 to 95.
3. What Type of Light Bulb to Choose?
Although there are many different types of light bulbs, the most preferred options for the workshop are fluorescent and LED lights. Fluorescent lights use inert gas-filled bulbs. Meanwhile, LEDs use diodes that emit light when the current passes through them.
By far, the best type of light bulb for workshops is the LED. These energy-efficient and affordable lights save up to 80% more power than fluorescent bulbs. Plus, they offer a bright and flicker-free illumination.
4. Installation Type: Hardwired VS Plug In?
The installation type determines how easily you can set up the lights. Typically, you will find the option of either plug-in or hardwiring. The plug-in light does not require any installation cost or effort.
You can simply plug it into the power outlet whenever you’re in the workshop. However, this can get tricky if you plan to use more than one light. Imagine how many lights you will have to plug in before getting to work!
That said, there’s a solution to it that we have discussed in the next heading. As for hardwiring, these lights will get fixed on the ceiling and walls permanently. You will also need to hire a certified electrician to do the job.
5. Linkable?
Using more than one plug-in light means you will have to switch on all of them first. It can be quite troublesome, which eradicates the purpose of a plug-in design (convenience).
However, you can resolve this issue by ensuring the light bulbs are linkable. It means that you can daisy chain them. So, when you open one light, all the others open automatically too.
Workshop Lighting Ideas
There are two fundamental types of lighting used in a workshop. These include:
1. Ambient Lighting
Ambient lighting means the general illumination of the workshop. It bounces off the walls to spread throughout the room uniformly and evenly. However, it does not focus on a specific area.
Its purpose is to make the room lit enough for you to see everything. Also, it helps ensure easy and safe traffic in the room. Some ambient workshop lighting ideas include:
- LED downlights/ recessed fixtures
- Ceiling-mounted lights
- Wall-mounted lights
- Track lights
2. Task Lighting
As the name explains, the task lighting is independent of the surroundings. It focuses on illuminating the area where you’ll carry out a specific task. A great example would be a workbench.
Since the focal point is small, task lights tend to be bright and powerful. However, it’s best to avoid any task light that creates overly harsh shadows. Some task workshop lighting ideas include:
- Under-cabinet lighting
- Pendant lighting
- Slimline bar lights
- Gimbal recessed fixtures/downlights
- Tape and extrusion lights
- Table lamps
Workshop Lighting Layout Suggestions
The workshop lighting layout affects how many lumens are present in each square foot. And so, if you don’t pay attention to this important aspect, you might end up with uneven lighting across the room. Also, there will be poor illumination and dark spots in task areas.
Typically, the lighting layout depends on the space shape. You may want to draw the area on paper and figure out the best possible light installations. To help, here are some layout suggestions:
- Install the lights at a distance of no more than 1.5-times the length. You can reduce the distance but never exceed it.
- Place the light at ⅓ to ½ its length from the walls.
Conclusion
All in all, knowing how many lumens per square foot workshop is very important. It can either make working there fun or frustrating. So, before you purchase any lights, do the calculations and find the right number of lumens per square. Good luck!